1. Introduction
Dear black powder friend: Certainly you have tried to make your own powder when a boy (why is it always the boys and never the girls who try it?). You probably got the saltpeter and sulfur-flowers from a drug store. If you bought the charcoal there, too, then it was powder-activated carbon, such as is used to stop diarrhea. Otherwise you might have used charcoal briquets which you ground yourself.
What ever ingredients you used, you were disappointed, the way I was 50 years ago. Though your homemade black powder burned at least, it burned about the way the head of a match stick burns, - with a hissing noise at best.
So what did we do wrong? We used the wrong charcoal! During the middle ages, charcoal was usually the only available coal - so people were very familiar with different kinds of charcoal and their properties. Their charburners were experts in charring it properly for different purposes like cooking, laboratory-tests, forging, soldering, black paint, melting of metals and, not at the least, black powder making. As I already have pointed out in former chapters, the recipe of your black powder is not very essential.
2. Literature
To promote the understanding of how our ancestors made black powder and how they looked at its chemistry, I recommend the following literature:
| 1) | Intendance federal des poudres, Bern (1980) |
| An introduction, how the Swiss powder mill in Aubonne makes black powder today, narrated step by step. This booklet contains many photos. (Visitor groups are welcome) | |
| 2) | Arillerie-Kollegium: "400 Jahre Zürcher Pulver" (1975) |
| 400 Years of Zurich Powder | |
| 3) | J. R. Partington: "Greek Fire and Gunpowder" (1960) |
| 4) | John Maxon Stillman: "The story of Early Chemistry" (1924) |
| 5) | Bruno Zschokke: "Handbuch der militärischen Sprengtechnik" (1911) |
| Handbook of Military Explosives | |
| 6) | S.J. von Romocki: "Geschichte der Sprengstoffchemie" (1895) |
| History of the Chemistry of Explosives. A book that is very often referred to. | |
| 7) | Zeitschrift für Pyrotechniker aller Art (Weimar, 1841-1855) |
| A periodical for "Fireworkers, Powder Millers, Saltpeter and Sulfur Producers", a most informative reference. There you find old powder-maker tradition combined with the dawning of modern chemistry. | |
| 8) | Georg Agricola "Vom Berg- und Hüttenwesen" (1557) |
| Of mining and smelting and illnesses of the miners with 250 wood prints. A classic, in use till 18th century. | |
| 9) | Anonimus: "Das Feuerwerkerbuch" (1420) |
|
Original Written in Middle Highgerman : www.feuerwerkbuch.de with an Engl. introduction |
3. Two useful recipes.
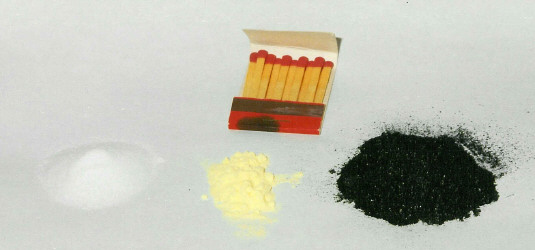
Usually black powder is a mixture of saltpeter, sulfur and charcoal. Also a black powder without any sulfur yields good results and produces even less smoke. (For how these ingredients are made, see the previous chapters).
A reasonable recipe is a mix of:
100 parts of saltpeter,
18 parts of char coal, and (Parts given by weight)
16 parts of sulfur
If you want to make a powder without sulfur, then mix
100 parts of saltpeter and
24 parts of char coal.
4. The charring of the wood
In the black powder era the charring process usually was a state secret. It was the crucial element of a good powder. But there is a simple - not to say a primitive - way, that leads to a fairly good charcoal:
Build a fire in your fire place or in your barbecue grill. Wait till there are no more flames, only embers, the kind you use to broil a steak. Then take a tin can with a lid which you can secure (by winding a wire around it, for instance) so that too much gas development won't blow it open. Drill a little hole in the lid, about the size you could push a pencil through. The hole should be large enough to allow the wood-gas to escape without building up too much pressure, but small enough to prevent the entrance of air.
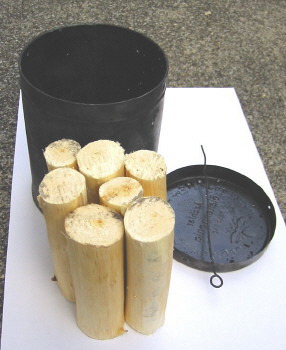
Fill this can with branches of wood about 2 to 3 centimeters in diameter. The wood should be very dry with the bark completely peeled off. It has to be young branches, not old wood from split logs. Willow or hazel wood is best. (See Fig. 1)
 |
|||
| Fig. 1: Dried wood sticks from a willow branch before charring in the can. On the lid lies the needle I use for securing the lid. |
|||
Then set the filled can into the embers and wait until wood gas is beginning to escape through the vent-hole. Set this gas afire, you need the flame as an indicator. Note: If lighted too early, the can may explode! So wear eye-protection. Frequently turn the can from one side to the other. Wait until the flame escaping through the vent-hole has just extinguished. Than take the can out of the embers, close the vent-hole (e.g. with aluminum foil) and wait till the can has cooled down. Don't open the can before the can is cold! Otherwise the charcoal might reignite.
 |
 |
|||
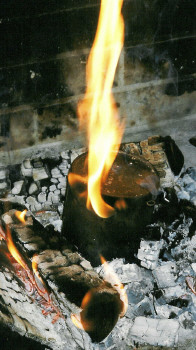
| Fig. 2: Strongly burning gas, escapeing from the vent in the lid of the charring can. |
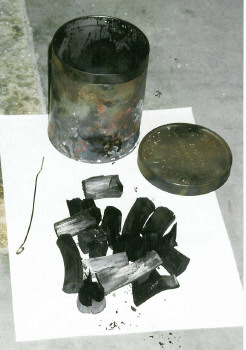
Fig. 3: That's what comes out of the charring can when opened after cooling. The charred wood has shrunk considerably. |
|||
For storing you may crush and grind the charcoal coarsely and put it into an air tight bottle.
I have investigated the rise of temperature inside a piece of willow branch with a diameter of 3 centimeters. I put it into an oven, preheated to 600 °C. (This temperature is normal for barbeque embers). Inside the wood I placed a temperature probe. The following graph shows the readings on the electronic thermometer. (See Fig. 4)
 |
||
| Fig. 4: The rise of temperature inside a branch of wood exposed to an environment of 600 °C |
||
Up to 200 °C, the core of the wood obviously was protected by the evaporating wood gas. The developing gas led the heat away from the sample. At 350 °C the smoke stopped coming from the oven.
I take it from this, that you can make a fairly good charcoal in a tin can placed in barbecue embers. When the smoke ceases, the charcoal has reached the ideal temperature of about 350 °C.
5. Grinding:
 |
||
| Fig. 5: Ingredients for one black powder batch, before mixing and dry-grinding | ||
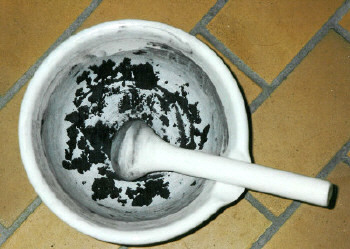
My grinding tool is a mortar and pestle made of porcelain. The mortar is a rather flat tray of about 30 centimeters in diameter, with a slightly rough surface. If you purchased a mortar and pestle with a smooth surface, then rough it up by grinding some crude quartz-sand or carborundum.
 |
|||
| Fig. 6: The wet grinding in a mortar with pestle. Note: Grind small portions only! |
|||
It's important, that you first finely grind each ingredient separately. Then mix them all together.
Don't overload the mortar. You will finish your job quicker if you grind a couple of small portions rather than a single large one. Don't worry about spontaneous ignition. It won't ignite. But refrain from smoking, when doing it! But anyway, you do it at your own risk.
After you have mixed and ground your black powder for a while (say ten minutes), then add about 8% water. Add it in small portions and rub and beat it, until it is the the texture of pottery clay. Pound and rub it for about 15 to 20 more minutes with the pestle. Then form it into a ball about the size of a golf ball.
Note: You also can grind the mix of black powder ingredients dry, without water. This black powder flour usually is called meal powder. This kind of powder burns slowly. By adding water the ingredients are better homogenisated causing an improved burning. So mixing blackpowder wet acts like magic.
6. The Corning
The black powder dough you have formed into a ball is corned by rubbing it through a sieve. A kitchen sieve with about 1.5 millimeter mesh will do the job. The grains then will correspond to Swiss powder CH2 or GOEX 3F. Spread the sifted flakes equally and loosely on a writing paper and let them dry. After the flakes have dried, sift them again through the same sieve. You can assist the process by useing fingers till all is sifted through. Then separate the fine dust by sifting the powder again through a sieve with about 0.3 millimeter mesh. In the kitchen such a sieve is commonly used as a flour sifter. Finally, add the discarded dust to a new batch of powder so nothing will be wasted.
 |
|||
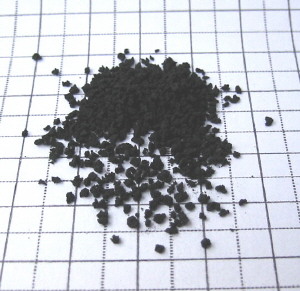
| Fig. 7: My homemade black powder on a 5 mm grid. Grains between 0.3 to 1.4 millimeter. |
|||
Your homemade black powder is now ready for use. It will perform like the best powder I tested in chapter "Recipe" and will beat all commercially manufactured powders.
7. Shooting with homemade black powder
Take into consideration that your homemade powder has far less bulk weight than commercially manufactored modern powder.
Bulk weights:
- GOEX 3F...............1,03 g/ml
- Swiss CH2 .............1.08 g/ml
- Homemade .............0.56 g/ml
Hence by volume you have to load about twice as much Homemade than with commercially manufactured powder because the density of homemade powder is only about halve of the comercial powder.
The reason for the higher bulk weight of commercial powders lies in the much longer milling time and by far higher mill pressure of the powder mills. The Swiss powder mill uses edge-mills with wheels from granite weighing tons.
There is more fouling than with Swiss powder, which burns extremely clean. With GOEX there is some more fouling than with Swiss, but the homemade powder fouls clearly more than this. The reason: Fouling is diminished by grinding the char coal extremely fine.
The price of my homemade powder is clearly lower than that of the Swiss factory made powder. But I didn't take into account wages. Though it would be possible to make all black-powder ingredients by yourself at no expense, I never considered this seriously, other than for scientific reasons.
Prices in Switzerland: (when bought by the kilogram)
1 kg Black powder Swiss CH2......Fr. 65.00 (in 2010)
1 kg Homemade powder:
| 0.75 kg | Saltpeter | Fr. 22.25 |
| 0.13 kg | Char coal (homemade) | Fr. 00.00 |
| 0.12 kg | Sulfur | Fr. 02.80 |
|
|
||
| 1 kg | Homemade bp | Fr. 25.05 |
8. Comparisen of burning factory-made powder and homemade powder
Quite obviously factory made powder is burning quickest, followed by homemade and sulfurless powder. But mind, this doesn't say anything about their performance when fired in a barrel!
| Combustion of three samples of black powder - Factory made - Homemade regular - Homemade sulfurless Sample: 1.0 g each |
|||
9. Legal Aspects
In Switzerland the handling of black powder is regulated by the "Sprengstoffgesetz" (Explosives law). If black powder is used for shooting purposes only, it is considered a "propellant" and hence not subject to the explosives law.
Most, but not all, black powder is sold by gun shops. Anyone can get it informally, but has to sign a list provided by the shop, stating it will not be used as an explosive. There is no law that forbids the making of black powder for your own use. But you may not enter a road tunnel with more than five kilograms in your car. And you may not cross the border to a neighbouring state with it. In any case, all European states, save Switzerland, request a permit issued by their governments, for anyone entering with black powder.
At muzzle loader competitions, homemade black powder may not be used as long as the competition is governed by the MLAIC-rules. (Muzzle Loader Association International Committee). Rule 520 states: "Only factory made black powder may be used. And no black powder substitute may be used."
In all European countries, save Switzerland, it is strictly forbidden to make your own black powder. A violatior may be sentenced to a prison term. So watch out or immigrate to Switzerland!
Last updated: 29. 6. 2010.....