The Proving Mortar
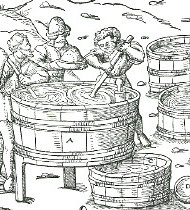
Testing Black Powder with a Mortar
As a practical shooter, I usually test my powder by means of a muzzle loading rifle and/or pistol. I measure the muzzle velocity of the bullet. (Look my "recipe" section). But that requires a chronograph, for measuring bullet speed, which costs a small fortune. And I have shot to pieces two of them already. An alternative is the ballistic pendulum, a somewhat clumsy instrument.
During the days when only black powder firearms were available, powder was usually tested by the manufacturer as well as by the customer, this by means of a proving-mortar, such as shown below.
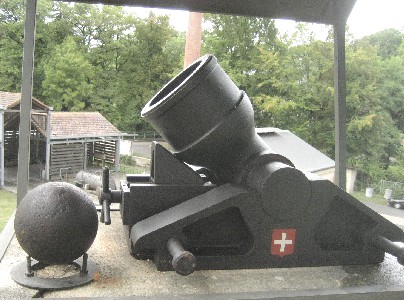
According to the contract between the Swiss Powder Administration and the powder mill, Art. 20, dated Aug.12th 1849, this French model proving mortar had to shoot this very ball at least 715 Swiss feet (210 meter) by a charge of 98 grams of powder. Then the powder was accepted by the federation.
 |
 |
|||
| Fig. 1: The French proving mortar of the Swiss powder mill in Aubonne is no longer used. This is because the barrel cracked some 20 years ago while demonstrating it to a visitors group. |
Fig. 2: A glimpse into the barrel , cal. 19 cm, length 25 cm. Clearly outlined is the powder chamber at the bottom of the bore. |
|||
This method of powder testing takes advantage of the fact that the distance(D) of the projectile fired from a mortar is directly proportional to the powder’s energy (E).
 |
|
Calculation of ball/powder energy
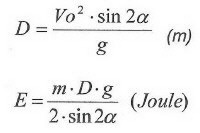
where:
| Vo | = muzzle velocity (m/s) |
| m | = bullet mass (kg) |
| α | = muzzle elevation |
| g | = gravity (9.81 kg m/s2) |
| E | = energy (Joule) |
And note: At an elevation of 45°, sin 2α =1.000
For example:
A 40 millimeter bearing ball used for a projectile weighs 0.272 kg. The load used is 1.00 grams of powder. Assuming, the ball travels 100 meters, a reasonable distance to measure. Then the bullet/powder energy is:

My Method
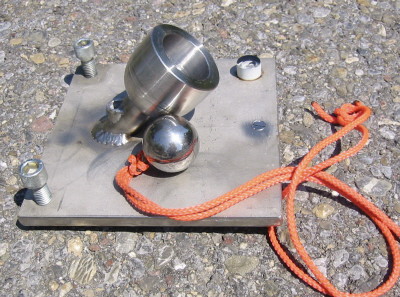 |
Fig. 3:
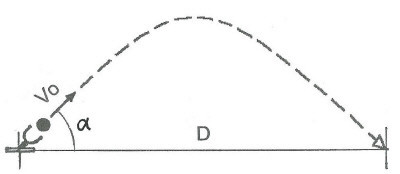
This is the mortar which I have used for many years. Made of stainless steel 18/8, with a bore of 40 mm at an elevation of 45°. It has three feet and a base plate that can be levelled out by means of two bolts (at the rear). Level is found by means of a spirit-bubble (fixed at the left front corner) |
||
Ignition is by means of slow match. To minimize loss of pressure, the touch hole is a very small, only 1.0 millimeter diameter. For reliable ignition, a mixture of bariumperoxide and zirconium, a very hot flash powder, is used for priming.
 |
|||
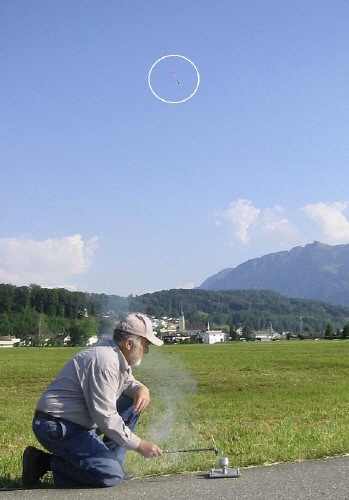
| Fig 4:
Firing the proving mortar near my home. There is a large flat meadow, usually with no pedestrians or cattle on it. |
|||
Some major results:
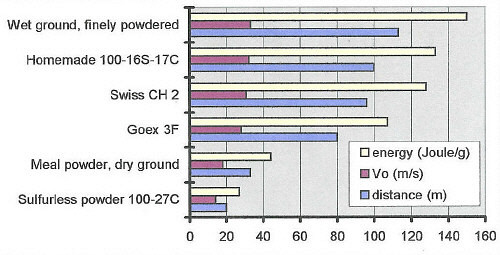
Fig. 4: Results fired with 1.00 gram of different powders
Conclusion
Ballistics measured with a mortar are not comparable with those determined by use of a rifle. For example, an Enfield rifle, loaded with 2,0 grams of Swiss black powder CH2 yields 400 Joule/g, where as the mortar yielded only 128 Joule/g. Even more disappointing are the results of sulfurless powder. Here, the rifle showed 370 Joule/g while the mortar only gave 27 Joule/g.
So, the mortar predominantly demonstrates the explosivity of a powder, while the rifle will demonstrate its performance as a propellant.
Last updated: 14. Sept. 2009